Configuring Plesk SpamAssassin spam filter correctly is one of the highest-impact steps you can take to protect every mailbox on your server. Without proper tuning, SpamAssassin either lets junk through or silently drops legitimate messages — and on a shared hosting server, that affects every domain you manage. This guide walks you through enabling SpamAssassin server-wide, calibrating score thresholds, solving the greylisting multi-IP problem that breaks Amazon SES and Outlook delivery, and validating your setup before it goes live.
How Plesk SpamAssassin Works: Scoring, Thresholds, and Actions Explained
SpamAssassin is a rule-based mail filter that assigns a numerical score to every incoming message. Each rule tests a different signal — header anomalies, body keyword patterns, DNS blacklist hits, Bayesian token matches, and more. When the total score crosses the threshold you define, Plesk treats the message as spam and applies the action you have configured (tag subject, move to Junk, or delete).
How the Score Accumulates
A message does not need to trigger one big rule to be flagged. It is far more common for a spam message to accumulate small hits: +1.5 for a missing Date header, +2.0 for a known spam phrase, +3.0 for a DNSBL hit. Legitimate marketing email can score 3–5 points without being spam; Nigerian advance-fee fraud typically scores 15–25 points. Your threshold sits in the middle and draws the line.
What Plesk Does with a Spam-Scored Message
- Mark as spam — Adds
X-Spam-Flag: YESand optionally rewrites the subject line (e.g. prepends[SPAM]). The message is still delivered. - Move to Junk folder — Requires IMAP folders to be active on the mailbox. The safest option for most servers during initial rollout.
- Delete — Silent discard. Use only when you have high confidence in your threshold, because legitimate messages are lost permanently.
Key SpamAssassin Files on Plesk (Linux)
- Global config:
/etc/mail/spamassassin/local.cf - Per-user overrides:
~/.spamassassin/user_prefs(rarely needed when Plesk manages settings) - Bayesian database:
/var/qmail/mailnames/<domain>/<user>/.spamassassin/bayes_*
💡 None of these worked? Skip the guesswork.
Get Expert Help →Enabling Server-Wide SpamAssassin in Plesk: Step-by-Step
The following steps apply to Plesk Obsidian on Linux. Windows Plesk uses a slightly different UI path but the same underlying options.
Open your Plesk control panel at https://your-server-ip:8443 and sign in with your admin credentials.
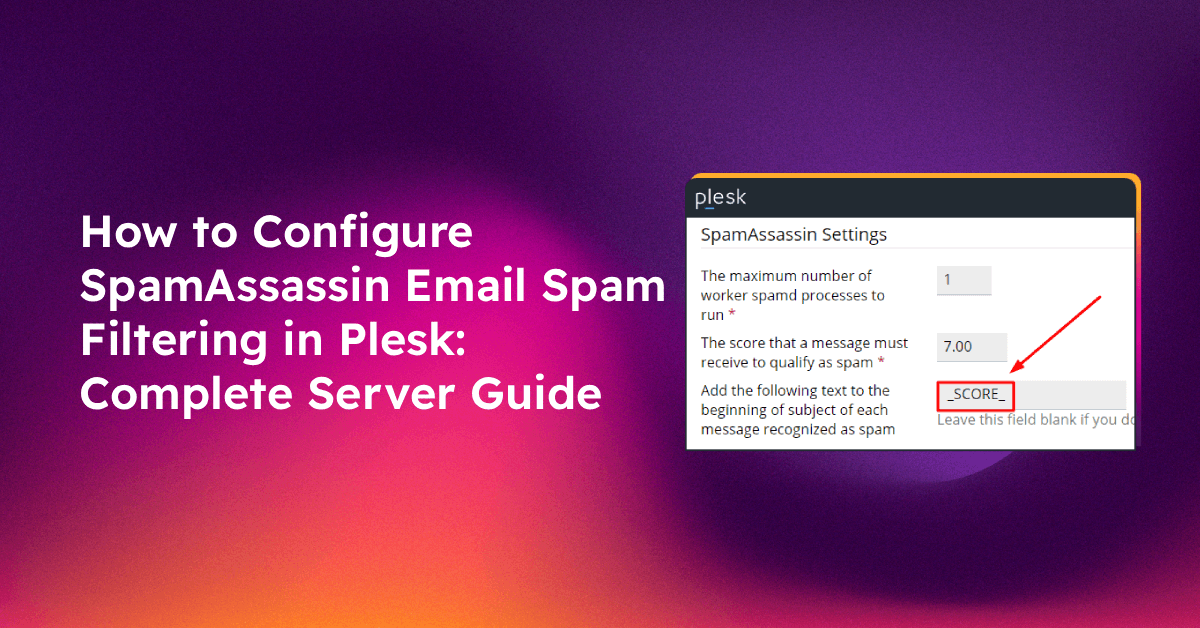
Go to Tools & Settings → Spam Filter. If you do not see this item, go to Tools & Settings → Updates and Upgrades and install the SpamAssassin component first.
Tick Switch on spam filtering. This activates the spamd daemon and instructs Plesk's mail pipeline to route every incoming message through it before delivery.
The default is 7. A score of 7 catches most spam while keeping false-positive rates low on a fresh install. You will tune this further in the next section.
Select Move to spam folder for the safest rollout. Change to Delete only after 2–4 weeks of monitoring confirm that no legitimate messages are being scored above your threshold.
Scroll to Apply these settings to all domains and click Apply. Individual domain owners can still adjust their own per-mailbox preferences inside their Plesk panel if you grant them that permission.
Click OK. Then SSH into your server and confirm SpamAssassin is active:
systemctl status spamassassin
# or on older init systems:
service spamassassin statusYou should see active (running). If not, start it manually:
systemctl start spamassassin
systemctl enable spamassassinTuning the Spam Score Threshold for Your Server's Traffic Profile
The default threshold of 7 is a conservative starting point. Servers that handle transactional email from SaaS platforms (billing notifications, password resets) often see legitimate messages score 3–5 because of aggressive marketing-style formatting. Servers that only receive person-to-person mail can safely lower the threshold to 5 or even 4. Here is how to approach the calibration methodically.
Reading the X-Spam Headers
Before changing any threshold, examine a week's worth of delivered mail headers. Every message that passed through SpamAssassin carries headers like:
X-Spam-Status: No, score=3.4 required=7.0
X-Spam-Report:
* 1.5 MISSING_DATE Missing Date: header
* 1.9 RCVD_IN_SORBS_DUL RBL: SORBS: sent directly from dynamic IP
* 0.0 HTML_MESSAGE BODY: HTML included in messageLook for patterns: which legitimate senders score highest? What is the gap between your highest-scoring good messages and your lowest-scoring spam? Your threshold should sit in that gap.
Recommended Threshold Strategy by Server Type
- Mixed hosting (many domains, unknown senders) — Start at 7, lower to 6 after two weeks if spam still gets through. Rarely go below 5.
- Business email only (known sender pool) — A threshold of 5 is appropriate. Add known good senders to the whitelist to eliminate false positives.
- High-volume transactional inbox — Keep at 7–8. Many transactional senders (payment processors, CRMs) score 4–6 due to HTML-heavy templates.
Adjusting the Threshold via Plesk CLI
You can change the server-wide threshold from the command line without touching the GUI:
plesk bin spamassassin --update -required-score 6To check the current value:
plesk bin spamassassin --infoTraining the Bayesian Filter
SpamAssassin's Bayesian component learns from examples. Feed it known-good and known-bad mail to improve accuracy over time:
# Train on ham (legitimate mail)
sa-learn --ham /path/to/good/maildir/
# Train on spam
sa-learn --spam /path/to/spam/maildir/
# Check database stats
sa-learn --dump magicA well-trained Bayesian database with at least 200 ham and 200 spam samples can reduce false positives by 30–40% compared to rule-only scoring.
Fixing Greylisting Delays for Amazon SES, Outlook, and Other Multi-IP Senders
Greylisting is one of the most effective anti-spam techniques available, but it has a serious flaw: it assumes the same mail server will retry delivery from the same IP address. Large email infrastructure providers — Amazon SES, Microsoft Outlook/Office 365, Google Workspace, and Mailchimp — operate enormous fleets of outbound servers. When they retry a greylisted message, the retry often comes from a different IP. Plesk's greylisting daemon sees this as a brand-new connection, greylists it again, and the cycle repeats. The result is email delayed by hours or even days.
Why This Happens in Detail
When greylisting receives a new connection from an unknown sender, it temporarily rejects it with a 451 Try again later SMTP response. The sending MTA is expected to queue the message and retry, typically after 5–30 minutes. Normally the retry comes from the same server IP, greylisting recognises the sender IP + sender email + recipient email triplet, and delivers the message.
Amazon SES uses hundreds of IPs in ranges like 199.255.192.0/22 and 54.240.0.0/18. Each retry may come from any of these. Microsoft Outlook routes through *.outbound.protection.outlook.com — again, a large pool. The greylisting triplet never matches, and mail never gets through until the retry happens to land on the already-approved IP — which can take days.
The Fix: Domain-Based Whitelisting in Plesk Greylisting
Plesk's greylisting tool supports whitelisting by sender hostname pattern. This is safer than IP-range whitelisting because the domains themselves are stable and owned by the providers you trust.
Whitelist Microsoft Outlook/Office 365:
plesk bin grey_listing -u -domains-whitelist 'add:*outbound.protection.outlook.com'Whitelist Amazon SES:
plesk bin grey_listing -u -domains-whitelist 'add:a*smtp-out*.amazonses.com'Whitelist Google Workspace / Gmail:
plesk bin grey_listing -u -domains-whitelist 'add:*.google.com'
plesk bin grey_listing -u -domains-whitelist 'add:*.googlemail.com'Whitelist Mailchimp/Mandrill:
plesk bin grey_listing -u -domains-whitelist 'add:*.mcsv.net'
plesk bin grey_listing -u -domains-whitelist 'add:*.mandrillapp.com'Verify all active whitelist entries:
plesk bin grey_listing --infoAlternative: Disable Greylisting for Specific Domains on Your Server
If a particular domain you host receives a large volume of legitimate newsletters or transactional mail, you can disable greylisting just for that domain without affecting others:
plesk bin grey_listing -u -domains-whitelist 'add:receipts@examplestore.com'Or disable greylisting entirely for one of your hosted domains via Plesk GUI: Domains → yourdomain.com → Mail → Spam Filter → Greylisting → Disable.
When to Disable Greylisting Entirely
Greylisting is most valuable on servers receiving a high ratio of direct-to-MX spam from botnet IPs. If your server is primarily a business email host with known sender pools, and greylisting delays are causing support tickets, it may be appropriate to disable it server-wide and rely on SpamAssassin's scoring plus DNSBL checks instead. Go to Tools & Settings → Spam Filter → Greylisting and uncheck Enable greylisting.
Setting Up Server-Wide and Per-Mailbox Blacklists and Whitelists
SpamAssassin and Plesk's greylisting engine each have their own whitelist/blacklist systems. Understanding which one to use for which problem saves hours of troubleshooting.
SpamAssassin Blacklists and Whitelists (Score-Based)
These affect the spam score assigned to a message, not whether it is delivered.
Add trusted senders to the SpamAssassin whitelist via /etc/mail/spamassassin/local.cf:
# Whitelist by sender address (score reduced by 100 points)
whitelist_from noreply@trusted-bank.com
whitelist_from *@yourpaymentprocessor.com
# Blacklist a known spam domain (score increased by 100 points)
blacklist_from *@known-spam-domain.example
blacklist_from *@*.phishing-network.exampleAfter editing local.cf, restart SpamAssassin:
systemctl restart spamassassinPer-Mailbox Settings via Plesk GUI
Domain administrators and mailbox owners can manage their own whitelist/blacklist entries:
- Log in to Plesk as the domain owner.
- Go to Mail → email@yourdomain.com → Spam Filter.
- Under White List, add sender addresses or domains that should never be marked as spam.
- Under Black List, add senders that should always be treated as spam, regardless of score.
These per-mailbox entries are stored in the user's ~/.spamassassin/user_prefs file and take priority over server-wide rules.
Using DNS-Based Blacklists (DNSBLs)
DNSBLs are external databases of known spam-sending IPs. SpamAssassin queries them automatically, but you can add additional lists to local.cf:
header RCVD_IN_SPAMHAUS eval:check_rbl('sbl-xbl', 'sbl-xbl.spamhaus.org.')
describe RCVD_IN_SPAMHAUS Sending IP listed in Spamhaus SBL/XBL
tflags RCVD_IN_SPAMHAUS net
score RCVD_IN_SPAMHAUS 3.5Common reliable DNSBLs: zen.spamhaus.org, bl.spamcop.net, dnsbl.sorbs.net.
Testing Your Spam Filter Configuration Before Going Live
Never assume your configuration is working — verify it with real test traffic before relying on it in production.
The GTUBE Test String
SpamAssassin ships with a built-in test trigger called GTUBE (Generic Test for Unsolicited Bulk Email). Including this exact string in the body of a message will always produce a very high spam score:
XJS*C4JDBQADN1.NSBN3*2IDNEN*GTUBE-STANDARD-ANTI-UBE-TEST-EMAIL*C.34XSend an email to one of your hosted mailboxes with this string in the body. If SpamAssassin is working, the message should be flagged immediately. Check the headers for X-Spam-Flag: YES and a score above your threshold.
Checking the SpamAssassin Score from the Command Line
You can score a raw email file directly without sending it:
spamassassin -t < /path/to/test-message.emlThis prints the full score report to stdout, showing exactly which rules fired and how many points each contributed.
Monitoring the Mail Log
Watch the Plesk mail log in real time to see SpamAssassin decisions as messages arrive:
tail -f /var/log/maillog | grep -i spam
# or on Debian/Ubuntu-based systems:
tail -f /var/log/mail.log | grep -i spamChecking SpamAssassin's spamd Status
systemctl status spamassassin
journalctl -u spamassassin -n 50 --no-pagerLook for errors like spamd: server killed by SIGTERM or rules not loaded — these indicate a configuration syntax error in local.cf.
Sending a Benign Test Message Through the Full Pipeline
After enabling SpamAssassin, send a plain-text email from a Gmail or Outlook account to one of your hosted mailboxes. View the raw message source and confirm that the X-Spam-Status header is present with a low score (ideally below 2.0). If this header is missing, SpamAssassin is not in the mail pipeline — re-check whether the spamd daemon is running and whether Plesk's mail handler is correctly invoking it.
Getting spam filtering right is genuinely complex, especially on a server hosting dozens of domains with different traffic patterns. If you need ongoing expert oversight — threshold tuning, Bayesian training, DNSBL customisation, and greylisting exceptions — consider managed Plesk server support from CloudHouse Technologies. Our engineers handle the configuration details so you can focus on your business.
FAQs
See the FAQ section below for answers to the most common questions about Plesk spam filtering.
Properly configured SpamAssassin in Plesk delivers a dramatic reduction in inbox spam without sacrificing legitimate mail delivery. The key is a methodical approach: enable server-wide filtering first, monitor score distributions for a week before adjusting thresholds, whitelist the multi-IP senders like Amazon SES and Outlook that break greylisting, and validate with real test messages before declaring the configuration complete. With the commands and steps in this guide, you have everything you need to lock down your Plesk mail server against spam for the long term.